


How to organise a creative moodboard
A guide to efficiently gathering references for your environments.

When starting a new project, one of the first steps is to develop the initial idea by looking for references that can inspire and guide you on this new journey. I will show you how to find consistent references and create a moodboard that will optimise your workflow.
But first... What is a moodboard? It's a kind of very visual collage that can be digital or physical and is mainly made up of images, a bit like when we used to cut out images from the magazines or catalogues we liked when we were kids. However, it can also contain videos, links, text, drawings and much more, anything that might be useful for your project. It also allows you to follow a guideline along the project and avoid getting lost.
To make one, there are many downloadable or online applications available. The best, which I use and recommend, is the free PureRef software, available on Windows, Mac and Linux. You can also use software such as Photoshop or use online applications such as Miro which is particularly useful and easy to manage for multi-part projects. For iPad users, you can use the VizRef application which works in the same way as PureRef, but is not free. To find your references, the most basic search is to go to Google Images. To find what you need, go to Pinterest, ArtStation, Instagram, Twitter, Sketchfab or YouTube. The more content you have in your moodboard, the better.
We'll now see how to organise it so that you can further improve your workflow, by dividing it into several categories. I'll show you how I organise myself, by pretending I'm making a stylised 3D environment including an old Vespa, in a small village in Italy.
The Vespa
As this scooter will be the main object of the scene, I will concentrate on it first. First I'll look for lots of photos to illustrate it, from all angles, to get an idea of the volumes.

So the above section includes about forty photos and promotional posters of the Vespa, with different configurations and colours. This gives me a wide range of choices.
Now that we have collected photos of the Vespa, I will try to see what has already been done that could be a source of inspiration for the project.

So I have been gathering images of 3D modelled Vespas, both stylized and realistic, from video games and movies, including the Pixar movie Luca. As you may have noticed, the images do not all include Vespas, but also other types of stylized vehicles to give me an idea of the possible shapes of the future modeling. When we make a stylized object, we caricature its lines a bit, we exaggerate them.
Then, to reproduce an object well, you have to analyse it, you have to understand how it works, especially for mechanical objects, even more so if they are to be animated later! So don't hesitate to collect blueprints, diagrams and detailed photos, and watch explanatory videos. You can also break down the object by simply redrawing it. This is not always fun, but it is sometimes necessary when you have to make more complicated objects. It is like studying the anatomy of a human being or an animal before drawing or modelling it.

The environment
We'll come back to the Vespa later but it's time to move on to the second part which concerns the environment. The process is almost the same, I will first look for images representing real places that I could take inspiration from, such as small Italian villages. Their unique and recognisable architecture will create an authentic atmosphere for the scene. Then I will look for 3D environments and drawings that I will use as references for the shapes of the buildings. In particular, I will be searching for villages with colourful houses perched on rock formations. The aim is to create a scene representing the typical "dolce vita" of the country.
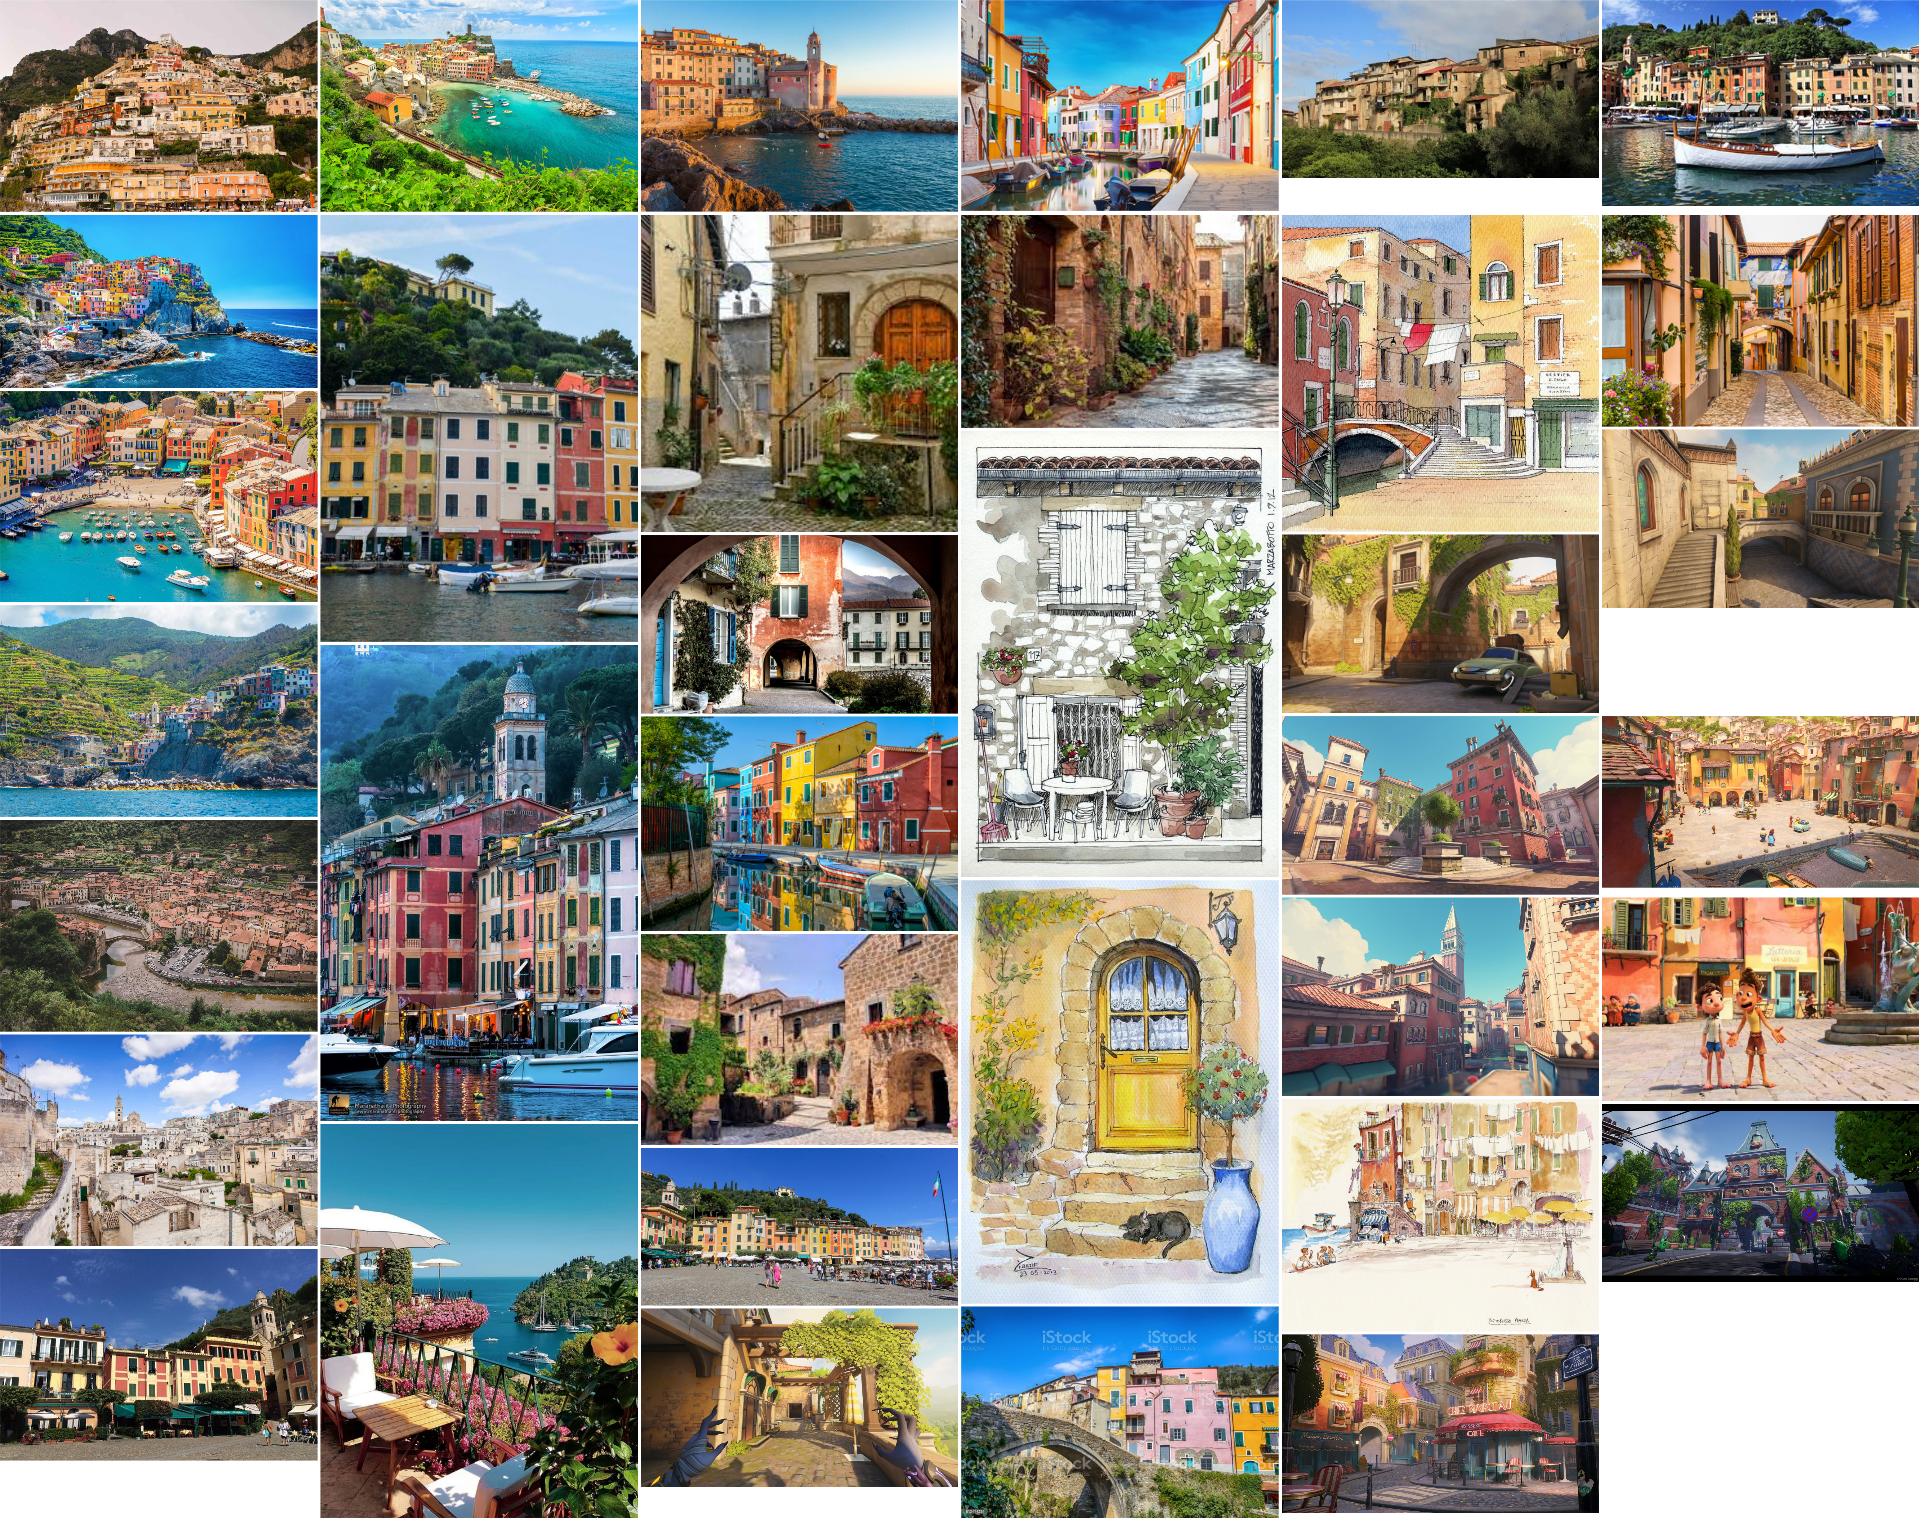
As the environment will be secondary in the hierarchy of my scene (I want the focus to be on the Vespa first), I need fewer elements. A few pictures and some documentation are enough for me. As you have seen, not all the game references represent Italy but allow me to imagine a stylized town.
Colors
Having a colour palette established at the beginning of a project is an asset, and it should be defined according to the mood you want to set. Like the references I have collected, I would like my scene to be colourful and warm. I advise you to create palettes, or at least to highlight certain colours, thanks to the references. I learned this method by watching a video with Jasmin Habezai-Fekri on YouTube, where she explains how she uses her references for her textures.
I generated the palettes from the reference images on the Coolors website. You can also make your palettes with the eyedropper tool on Photoshop. On this software, you can also use the crystallization on your images, it will allow you to see the different colours that compose your image more easily (Filters > Pixelate > Crystallize).
Materials
Let's move on to materials. The materials are a huge part of the work which is very important as they will allow the scene to come to life so I think it's very useful to gather images of textures. Having consistency between the different materials is very important, and also having materials that have realistic properties, although my choice to do stylized materials gives me a bit more freedom.

Doing this allows me to see how to work with textures, light reflections on surfaces, wear details, the way paint is worked and more.
Conclusion
Building a moodboard and organising it well can sometimes seem a bit long and tedious, but it will save time for the rest of your project and above all, it will improve your workflow. Everything will be gathered in one place to complete your project following the artistic direction you have chosen. Of course, you can always add to it throughout the project. Feel free to add notes, videos, links, drawings, anything you need to understand what you will have to accomplish. You can also add other categories of references to your moodboard, such as compositional references to help you decide how you will arrange your rendering, characters, street furniture, lighting, plants, etc... Your moodboard is there to help you, don't forget it!
Thank you for reading! See you soon!